
There is a very specific kind of frustration that belongs exclusively to people who cook in genuinely tiny kitchens — the frustration of opening a cabinet door and having it collide with the refrigerator door you just opened at the same time, of discovering that the cutting board cannot sit flat anywhere because every counter surface is occupied by an appliance that has nowhere else to live, and of standing in the middle of the kitchen realizing that turning around completely requires a deliberate, choreographed maneuver. Tiny kitchen living is real, it is daily, and it is genuinely solvable with the right combination of spatial intelligence, material wisdom, and the willingness to rethink what every surface, every wall, and every structural element in the kitchen can contribute to a space that works brilliantly within its genuinely limited dimensions.
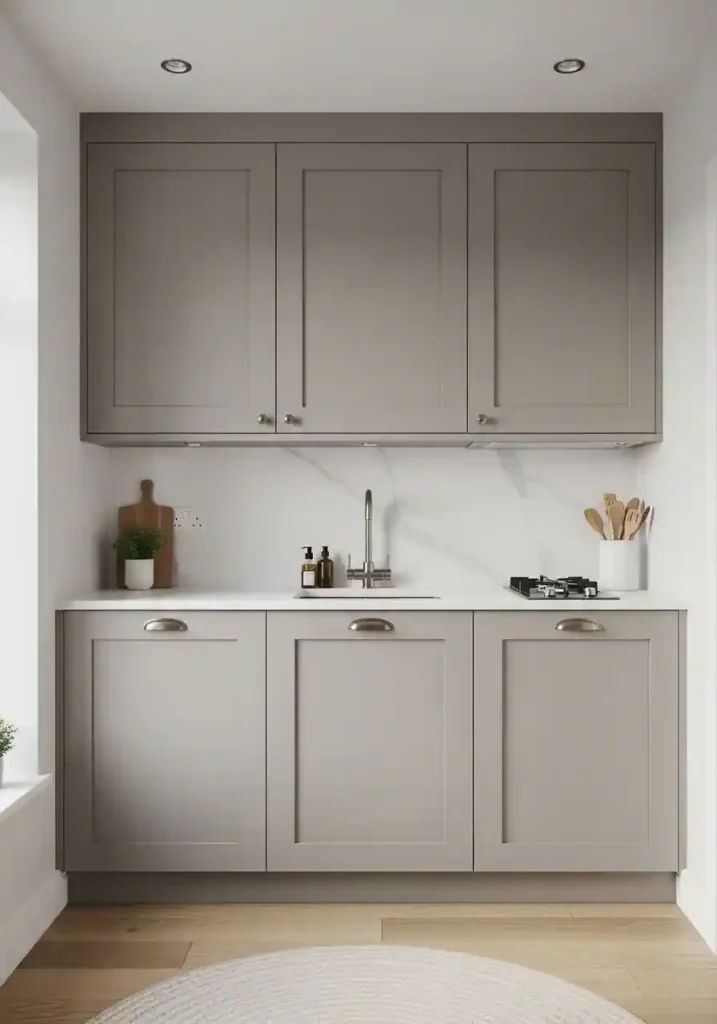
1. Light-Colored Cabinetry for Immediate Visual Expansion
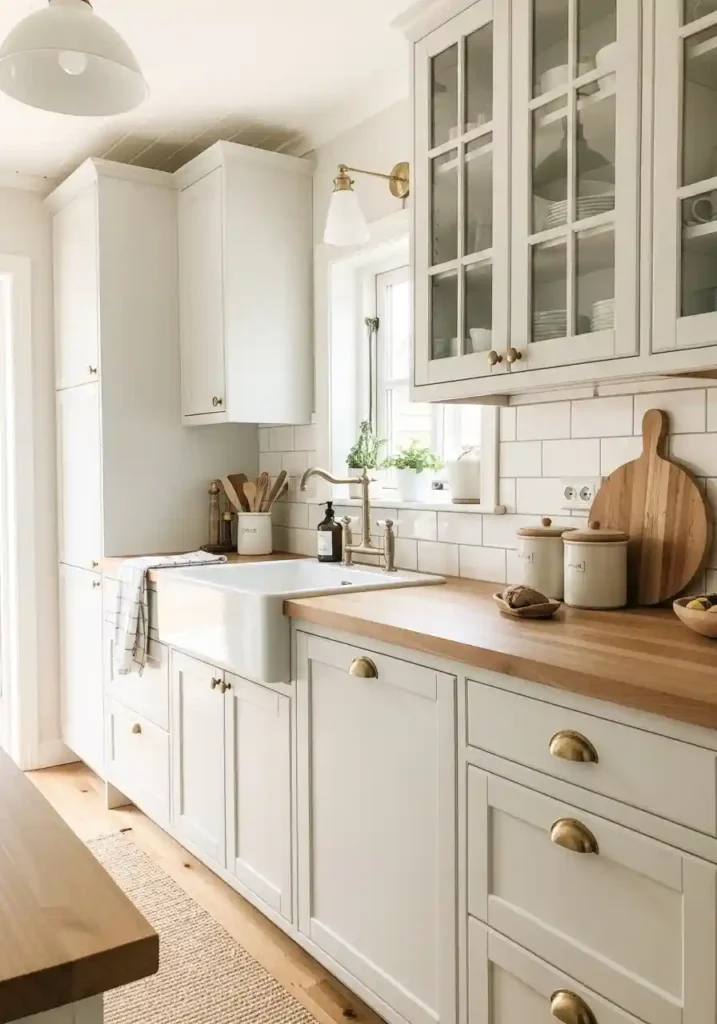
Light-colored cabinetry is the most immediately and most comprehensively space-expanding visual strategy available in a tiny kitchen — pale tones on the cabinet fronts reflect available natural and artificial light back into the space rather than absorbing it, making every surface appear to recede slightly and creating the impression of a kitchen with more visual depth and more visual generosity than its actual square footage provides. In a tiny kitchen where the cabinetry typically covers sixty to seventy percent of the visible wall surface, the cabinet color’s spatial impact is more significant than in any other room.
Choose warm whites, soft creams, pale warm greys, or gentle sage greens rather than pure cool white or stark bright white — warm-toned light colors create a kitchen that feels simultaneously spacious and warmly inviting, while very cool whites can create a clinical, unwelcoming quality particularly in north-facing kitchens with limited natural light. Paint the walls in a tone even slightly lighter than the cabinet color to create the most continuous, most seamlessly expanded visual experience throughout the tiny kitchen’s complete surface area.
2. Full-Height Cabinet Runs with No Crown Gap
Installing kitchen cabinetry that runs completely from floor to ceiling without any gap between the top of the upper cabinets and the ceiling maximizes storage capacity by converting dead structural air space into genuinely accessible organized storage. The gap above conventional upper cabinets — typically thirty to fifty centimeters of space that collects grease, dust, and the occasional forgotten item — represents significant lost storage capacity that full-height cabinetry reclaims entirely. In a tiny kitchen where every storage opportunity matters, this reclamation is practically transformative.
The visual impact of full-height cabinetry amplifies the spatial benefit considerably — the uninterrupted vertical line from floor to ceiling draws the eye upward and creates a powerful impression of increased ceiling height that makes the tiny kitchen feel more architecturally generous. This effect is most pronounced when the cabinetry is the same color as the ceiling or closely related in tone, creating a seamless upper zone that appears to expand vertically rather than stopping at an obvious cabinet-top boundary. Full-height cabinetry is among the highest-return investments in any tiny kitchen renovation.
3. Integrated Appliances for Seamless Surface Continuity
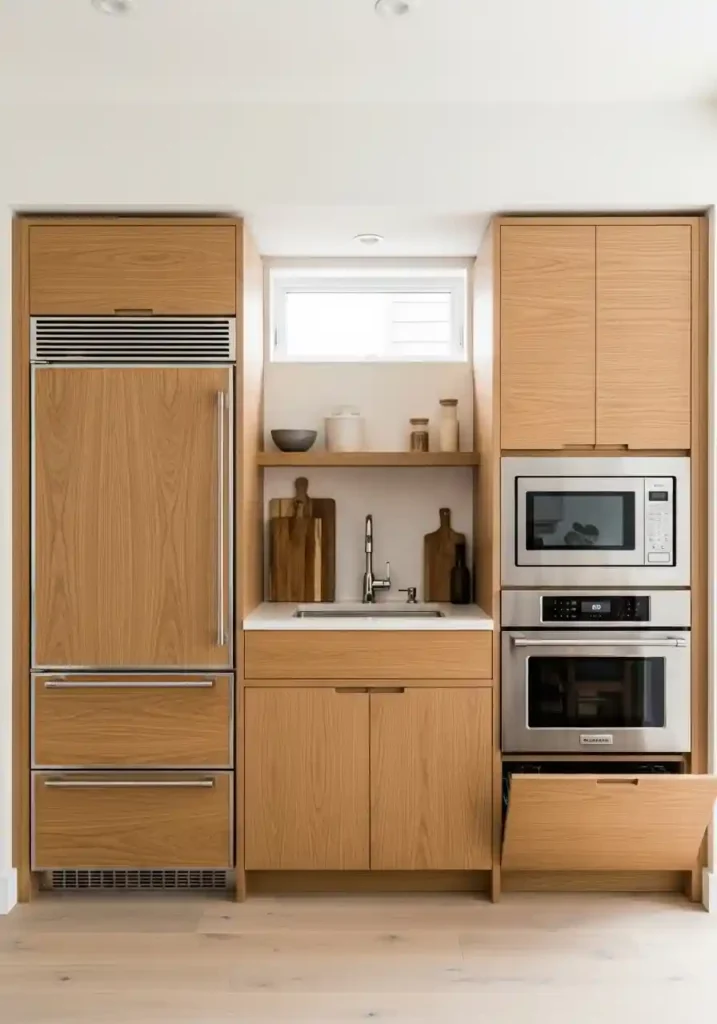
Concealing appliances behind matching cabinet panel fronts creates the most visually seamless and the most specifically resolved tiny kitchen surface available — when the refrigerator and dishwasher share the same panel material and finish as the surrounding cabinetry, the kitchen reads as one unified architectural composition rather than as cabinetry interrupted by multiple appliance faces in competing materials. This visual unification is particularly valuable in a tiny kitchen where every visual complexity makes the space feel more crowded and more chaotic than it actually is.
The investment in integrated appliance panels is proportionally most valuable in a tiny kitchen because the appliances, which in a large kitchen represent a fraction of the visible surface area, represent a much larger percentage of the total visible cabinet surface in a compact space. Even partial integration — adding matching panels to just the dishwasher and refrigerator — creates a meaningful improvement in the tiny kitchen’s visual cohesion. Choose panel thickness and edge detail consistent with the surrounding cabinetry for the most perfectly seamless integration.
4. Magnetic Wall Panel for Tool and Spice Organization
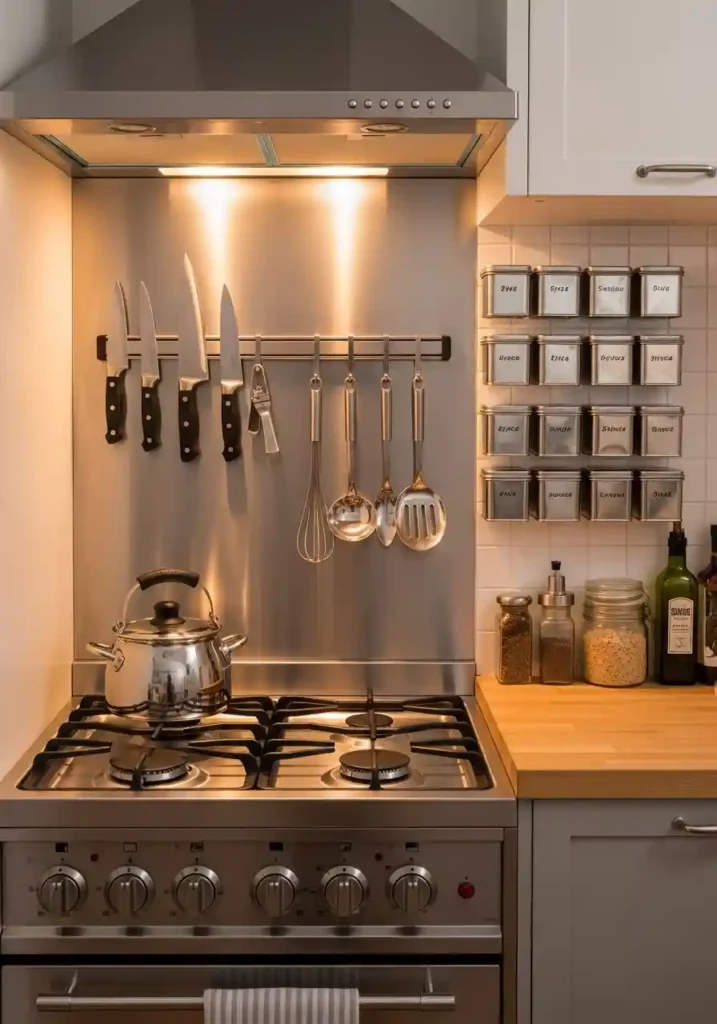
A full magnetic wall panel installed on the wall beside the stove creates the most comprehensive and the most specifically space-freeing wall organization system available in a tiny kitchen — a single magnetic surface can simultaneously hold the knife collection, the most frequently used utensils, a spice organization system of magnetic tins, and additional magnetic accessories like a paper towel holder, a recipe holder, or magnetic measuring cups. All of these items move from counter and drawer space to the vertical wall, returning those surfaces completely to food preparation use.
Install a stainless steel sheet, a painted steel panel, or a purpose-built magnetic kitchen panel at a comfortable reach height beside the stove where cooking tools are most frequently needed. A panel of approximately forty-five by ninety centimeters creates the largest usable magnetic surface within standard wall dimensions. Choose accessories that are designed for magnetic kitchen panels — purpose-built magnetic hooks, spice tins with strong magnets, and knife strips with appropriate magnetic strength — rather than relying on household magnets that may not hold kitchen items securely.
5. Pull-Out Pantry Tower for Narrow Space Utilization
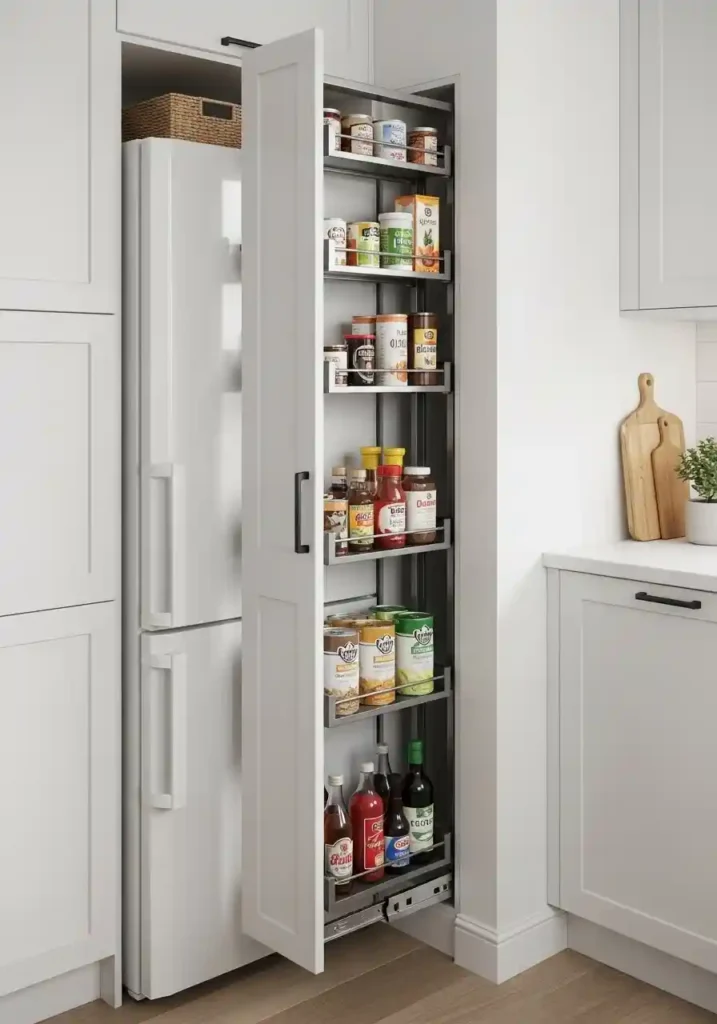
A pull-out pantry tower installed in a narrow gap — even one as slim as fifteen to twenty centimeters wide — between the refrigerator and an adjacent wall converts a dead structural space into fully accessible, fully functional pantry storage for dry goods, canned foods, condiments, and spices. The pull-out mechanism brings the tower’s complete contents to the front of the opening with a single smooth pull, making every item visible and immediately accessible without reaching into the space’s depth. This solution specifically addresses the narrow gaps that most tiny kitchens have and most tiny kitchen owners ignore.
Purpose-built slim pull-out pantry units in widths from fifteen to forty-five centimeters are available from kitchen specialty manufacturers and can be retrofitted into existing spaces with minimal modification. A fifteen-centimeter pull-out pantry provides sufficient width for single-file can and jar storage, while a thirty-centimeter unit provides double-file storage for a significantly larger pantry capacity. Even the most minimal gap beside a refrigerator or between cabinets often accommodates a slim pull-out pantry that dramatically increases the tiny kitchen’s accessible dry storage capacity.
6. Undermount Sink for Maximum Counter Continuity
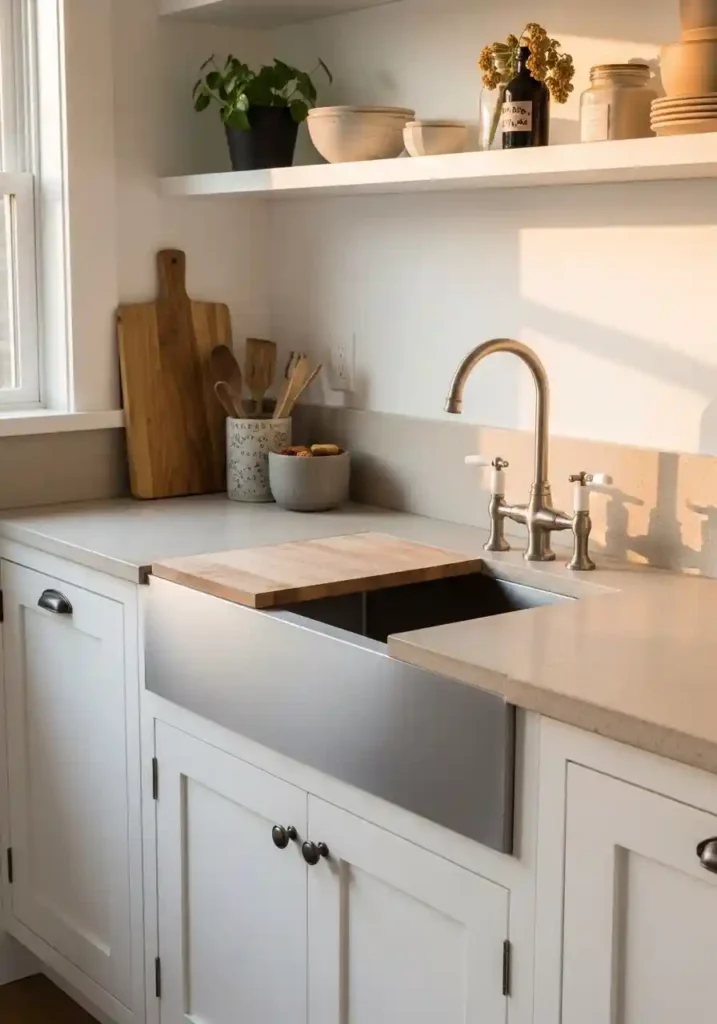
An undermount sink installed below the countertop surface rather than resting within a hole cut through it creates a continuous, uninterrupted counter plane that makes the tiny kitchen’s work surface appear significantly more generous than a drop-in sink of identical bowl dimensions would allow — the visual continuity of an unrimmed counter surface creates a seamless working zone whose total usable area is greater because items can be slid directly from the counter into the sink without the obstruction of an upward-facing sink rim.
The practical working benefit of an undermount sink in a tiny kitchen is the ability to use the sink’s interior as functional counter extension when the basin is empty — a cutting board or mixing bowl can rest half in the sink and half on the counter, effectively extending the available preparation surface into the sink’s volume. This counter extension function is particularly valuable in a tiny kitchen where every additional centimeter of preparation surface has real daily functional value. Undermount installation requires a solid surface countertop material that can support the sink’s weight without cracking.
7. Corner Carousel for Inaccessible Corner Cabinet Use
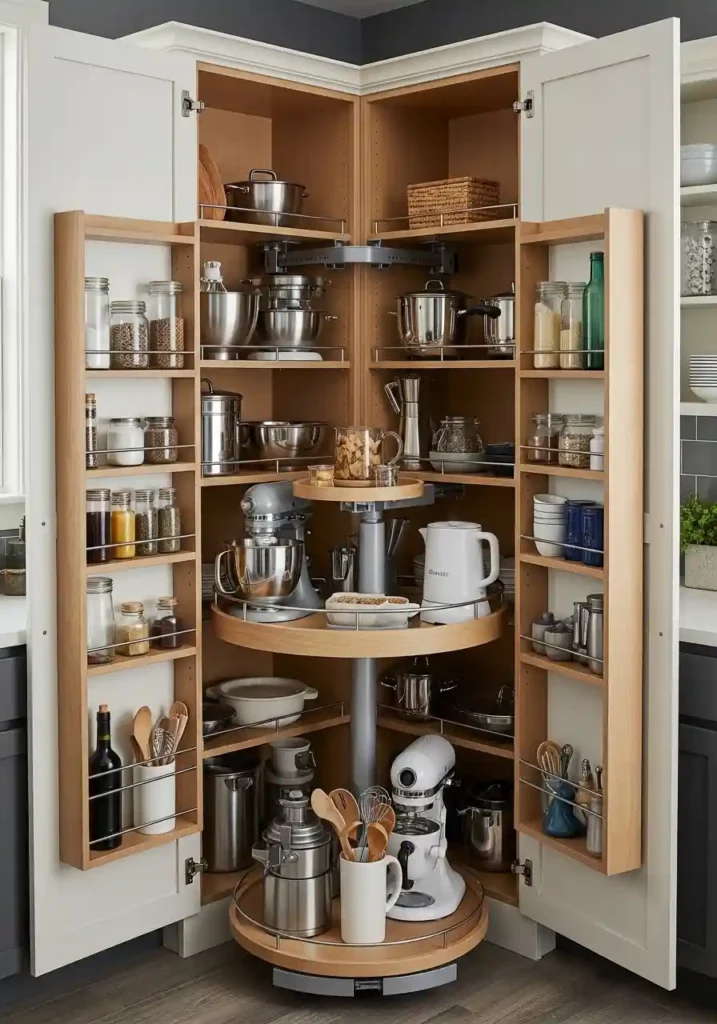
A rotating carousel or lazy Susan shelf system installed within a corner cabinet is the most effective solution for what is typically the most wasted storage space in any tiny kitchen — the deep, dark, awkwardly accessible corner cabinet that swallows items and makes them functionally irretrievable. A full-extension corner carousel with two rotating shelves brings the complete contents of the corner cabinet’s depth to the opening with a single rotation, making every item visible, accessible, and retrievable without the contortion of reaching into a dark corner.
Choose a full-extension carousel system that extends the shelves completely out of the cabinet opening rather than simply rotating within the cabinet interior — full extension systems provide complete item visibility and complete item access without reaching into the cabinet at all. Install the carousel system with shelves at heights appropriate for the items intended for that storage zone — lower shelves for larger items like mixing bowls and stock pots, upper shelves for smaller items like measuring cups and small appliance accessories. A well-functioning corner carousel system makes the corner cabinet the most accessible storage in the tiny kitchen.
8. Floating Shelves Above Counter for Open Display Storage
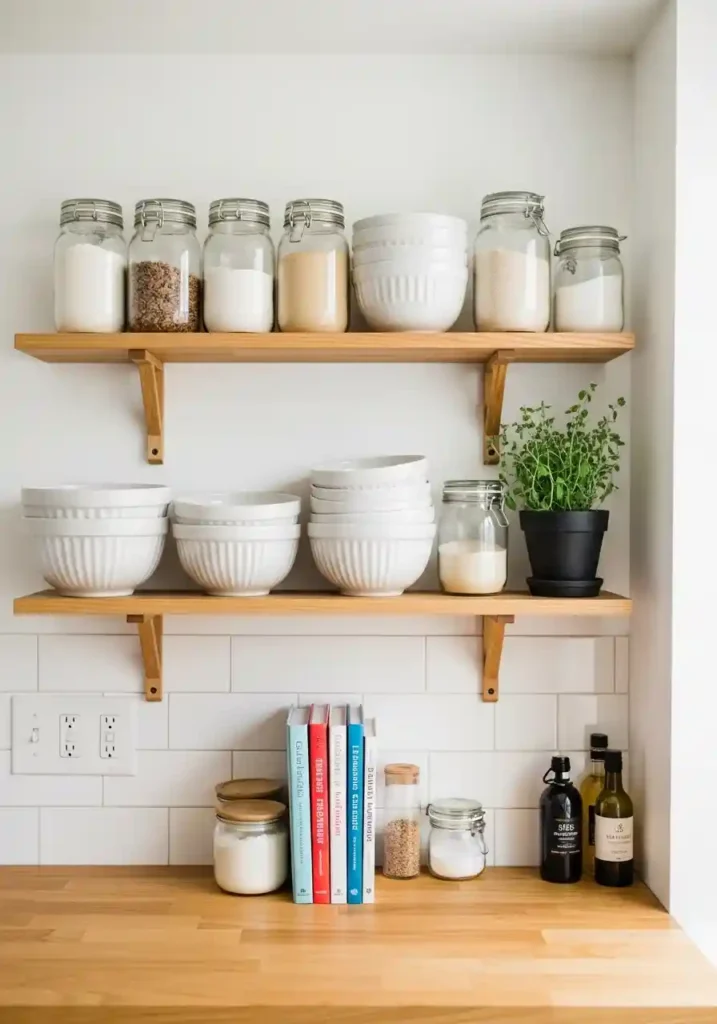
Floating shelves installed above the kitchen counter surface create immediate accessible storage and display capacity on wall surfaces that conventional cabinet installations might not reach — in tiny kitchens where cabinet runs may be limited by windows, doors, or other architectural constraints, floating shelves in a complementary material can fill these gaps with both practical storage and specific visual warmth. The open nature of floating shelves also creates visual depth at the wall surface, making the tiny kitchen feel more airy and more specifically designed than closed cabinet alternatives.
Choose a shelf depth of twenty to twenty-five centimeters — sufficient for single-file storage of most kitchen items without projecting so far into the kitchen’s limited floor space that items on the shelf interfere with counter work. Install floating shelves with concealed brackets or with visible brackets in the hardware finish used throughout the kitchen for the most specifically resolved aesthetic. Style floating shelves with genuine curation — grouping similar items, maintaining clear visual breathing space between groupings, and mixing practical pieces with plants and decorative objects creates a warmly beautiful tiny kitchen display.
9. Slim Toe-Kick Lighting for Floating Floor Effect
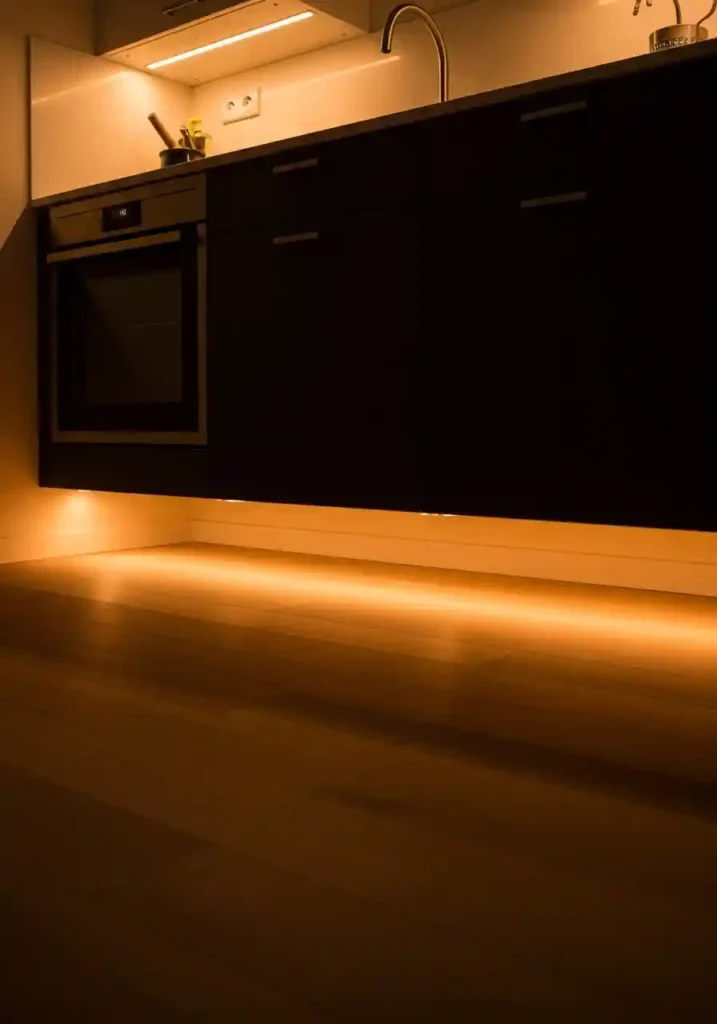
LED strip lighting installed in the toe-kick recess beneath lower kitchen cabinets creates the illusion that the cabinetry is floating above the floor rather than resting directly on it — the warm light emanating from the floor-level gap makes the lower cabinets appear to be suspended, which creates the impression that the kitchen floor extends continuously beneath the cabinet units. This floating cabinet effect visually expands the apparent size of the kitchen floor area and gives the tiny kitchen a specifically architectural quality that reads as deliberately, luxuriously designed.
Install warm white LED strips (approximately 2700 Kelvin) in the toe-kick recess, protecting the strips with a silicone waterproof sleeve appropriate for kitchen environments where floor washing and moisture are everyday realities. Toe-kick lighting creates the most dramatic effect when the surrounding kitchen is in relatively lower light — connecting the toe-kick lights to a dimmer or a separate switch from the main kitchen lighting allows the floating effect to be activated specifically during evening use when its visual impact is most specifically beautiful.
10. Bar Stools at Counter Overhang for Integrated Seating
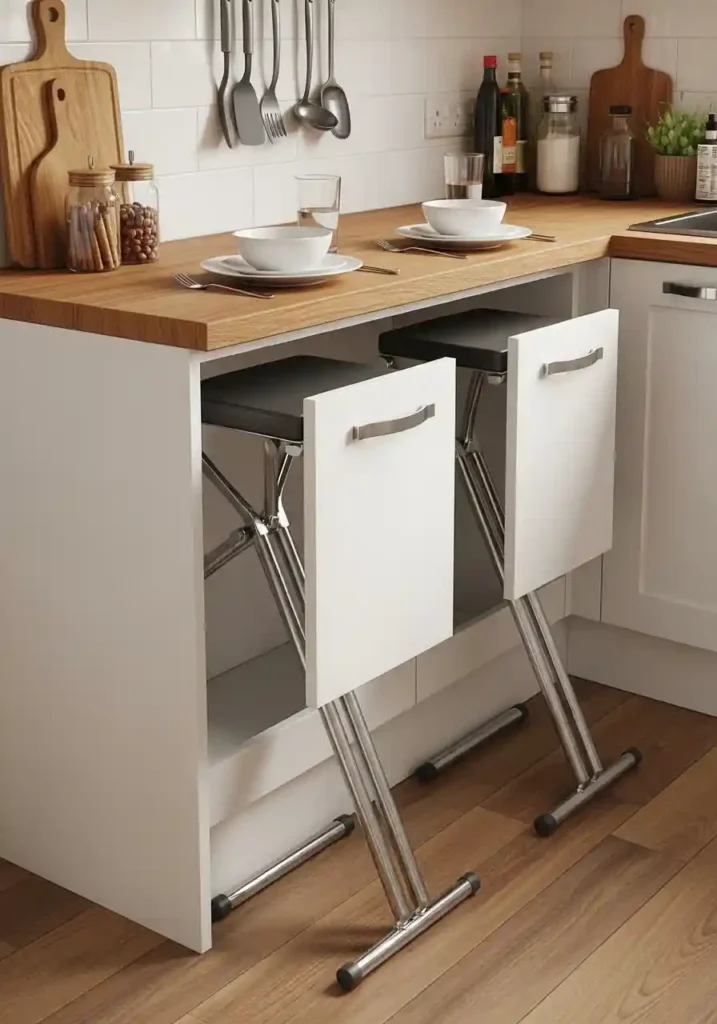
A counter overhang of ten to fifteen centimeters beyond the cabinet base creates a slim bar-height seating zone that accommodates two bar stools that tuck completely beneath the counter when not in use — leaving the kitchen floor completely clear during active cooking while providing genuine, comfortable seating for quick meals, casual coffee, or laptop work at the kitchen counter. This integrated seating approach provides the functional benefit of a dining table within the existing kitchen footprint without the floor space cost of a separate piece of furniture.
The bar stool selection is critical to this strategy’s success — choose the slimmest available stools with a seat diameter that fits completely beneath the counter overhang when pushed in, ensuring the floor space is genuinely cleared rather than simply reorganized. Slim metal bar stools with a seat diameter of approximately thirty centimeters and a footrest rather than full legs typically tuck most completely under a counter overhang. A counter overhang of fifteen centimeters provides comfortable knee clearance for most users at a standard bar counter height of ninety centimeters.
11. Mirrored Splashback for Doubled Depth Perception
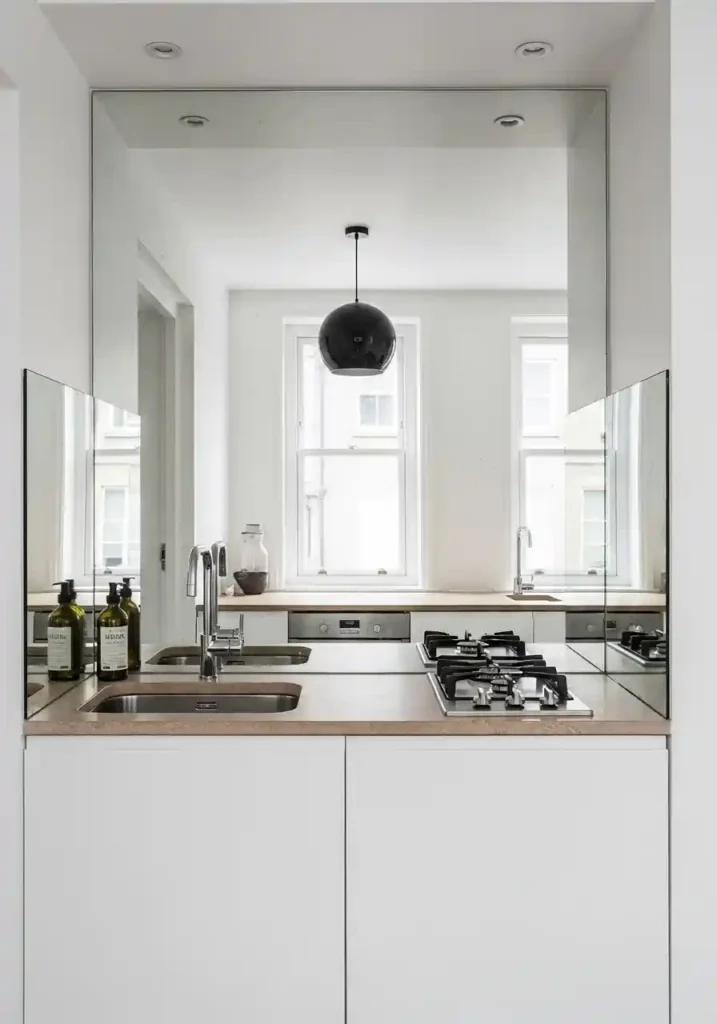
A full mirrored splashback covering the wall behind the counter creates the most dramatically space-amplifying visual effect available in a tiny kitchen through a single surface material choice — the mirror reflects the opposite kitchen wall, any window, and all available natural light, creating the impression of a second identical kitchen existing beyond the mirror surface. This visual doubling of depth makes the tiny kitchen feel significantly more generous and more specifically spacious than its actual dimensions. The reflected light also amplifies the kitchen’s brightness throughout the day.
For maximum spatial amplification, the mirrored splashback should cover the full height between the counter and the upper cabinets and the full width of the wall behind the counter and stove. A frameless mirror panel creates the most seamlessly expansive effect. Maintain the mirrored surface’s clarity through regular cleaning — kitchen grease and cooking vapors deposit on reflective surfaces and reduce their depth illusion effect significantly when the mirror is not kept clean. A streak-free glass cleaner and a microfiber cloth used weekly maintains the reflective quality.
12. Tension Rod Vertical Dividers for Upright Pan Storage

Tension rods installed vertically within a lower cabinet create individual slots that store baking sheets, cutting boards, muffin tins, and flat pans upright rather than stacked horizontally — transforming one of the most frustrating storage challenges in a tiny kitchen into a specifically organized, individually accessible filing system for flat kitchen items. The vertical storage system makes every item immediately visible from the front of the cabinet and immediately retrievable without disturbing surrounding items, eliminating the pan-avalanche problem that plagues horizontally stacked flat pan storage.
Tension rods for vertical pan dividers are installed between the cabinet’s top interior surface and the shelf or base below, spaced approximately eight to ten centimeters apart to create individual slots appropriate for most standard baking pan widths. The tension rod installation requires no tools and no permanent modification — rods are simply expanded to fit the cabinet’s interior height with spring pressure. A set of five to seven tension rod dividers across one lower cabinet creates a complete flat pan filing system that dramatically improves one of tiny kitchens’ most consistently frustrating storage scenarios.
13. Dish Rack Positioned Over Sink for Drip-Direct Drying
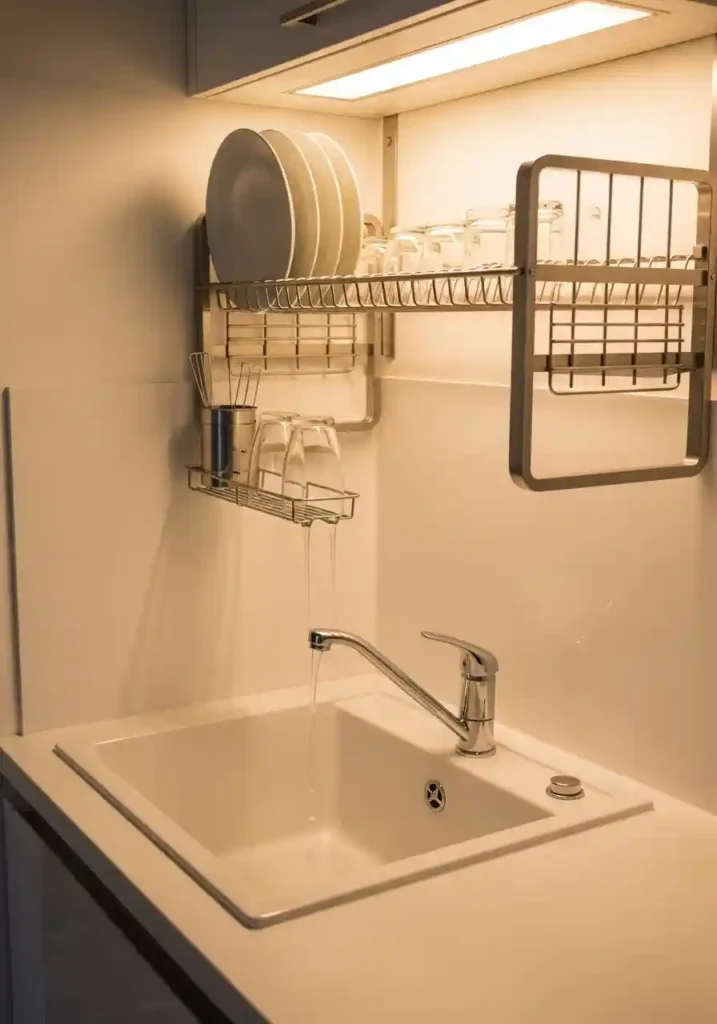
A wall-mounted dish drying rack installed directly above the kitchen sink positions the drying dishes over the sink basin so that drip water falls directly into the sink rather than onto a drying mat that occupies counter space. This arrangement completely eliminates the drying rack’s counter footprint — which in many tiny kitchens occupies the largest single-use dedicated counter space in the entire kitchen — returning that surface entirely to food preparation use while actually improving the drying function by allowing better air circulation around all sides of the drying dishes.
Wall-mounted over-sink dish racks are available in stainless steel, coated wire, and timber slat designs with mounting systems that install directly into the wall tiles or studs above the sink. Choose a rack with a built-in drip tray that channels water directly into the sink rather than allowing it to run down the wall. The mounting hardware must be installed into a structural support — either wall studs or appropriate masonry anchors — to safely support the weight of a full load of wet dishes, plates, and glasses without risk of pulling from the wall.
14. Induction Cooktop for Counter-Flush Installation
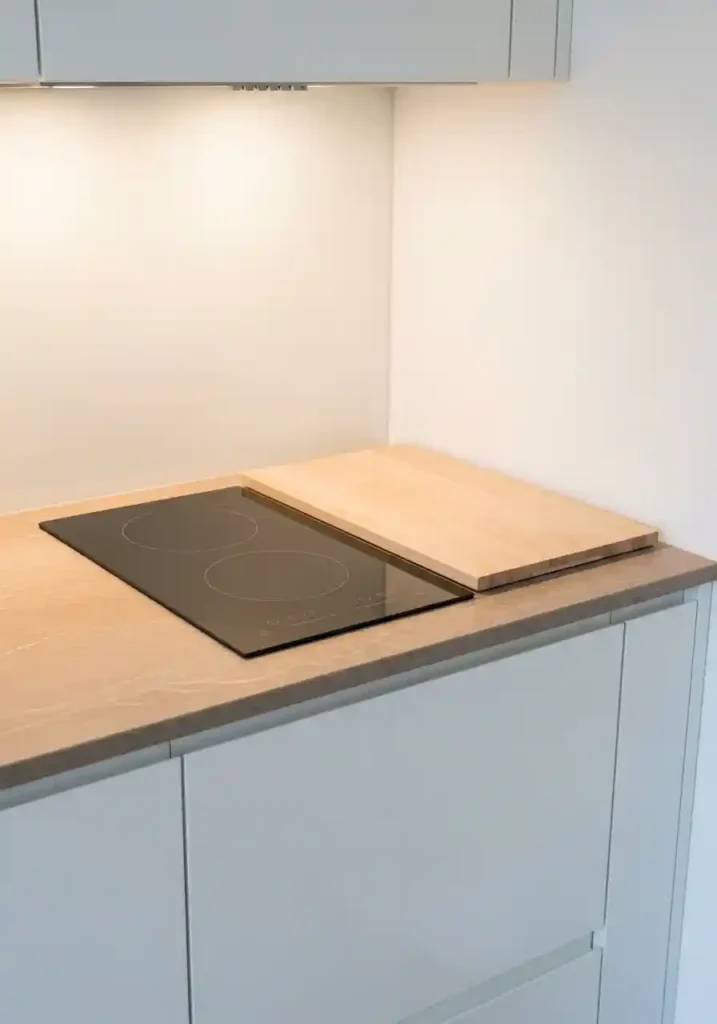
A portable induction cooktop installed in a custom-cut counter opening creates a cooking surface that is flush with the counter plane, eliminating the raised lip and the visual separation between cooktop and counter that conventional range installations create. When not in use, a custom-cut cutting board cover sits flush over the induction surface, creating a completely uninterrupted counter plane that functions as additional preparation space. This installation approach is particularly appropriate for tiny kitchens where the conventional range installation consumes floor space that a counter-mounted cooktop reclaims.
Portable induction cooktops installed in counter openings require adequate ventilation clearance beneath the unit and access to a standard electrical outlet — consult the specific unit’s installation requirements before creating a custom counter opening. The induction surface itself requires no gas line, no conventional electrical range circuit, and no ventilation hood if used with appropriate portable ventilation, making it the most installation-flexible cooking surface option for tiny kitchens with limited infrastructure. A two-burner induction unit provides sufficient cooking capacity for most one to two person households in the smallest possible counter footprint.
15. Cabinet Interior LED Lighting for Depth Visibility
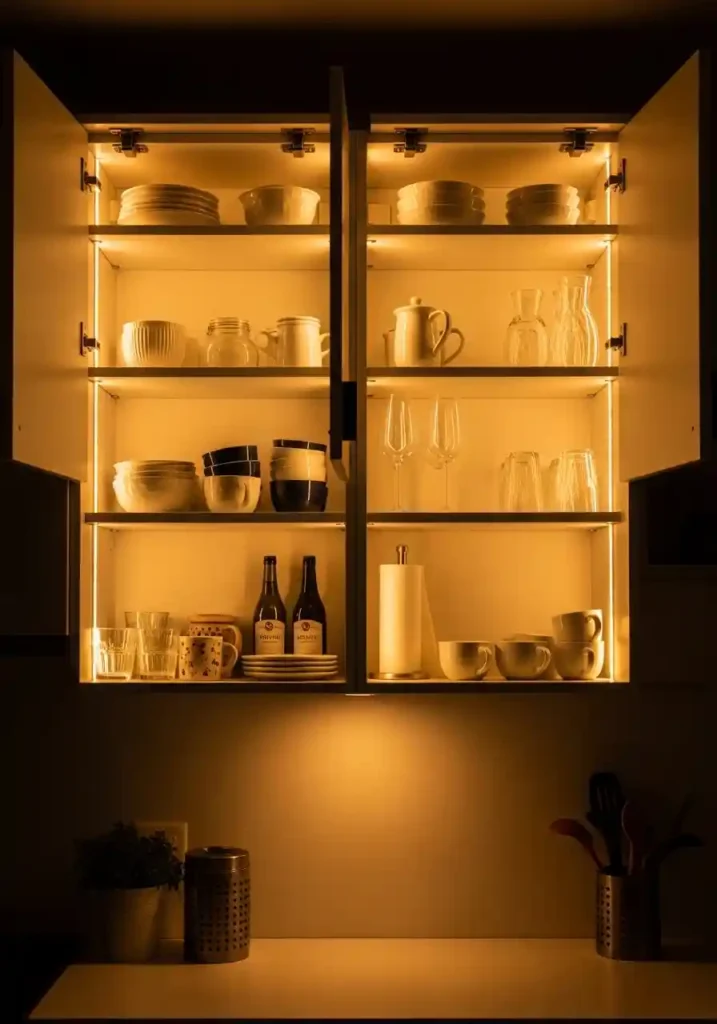
LED strip lighting installed inside upper kitchen cabinets illuminates the cabinet’s complete interior depth, making every item on every shelf fully visible without reaching or searching — a specific practical benefit in a tiny kitchen where dense cabinet storage often results in items being obscured by items in front of them. The interior cabinet lighting also creates a visual effect of greater cabinet depth, making the tiny kitchen’s storage appear more generous and more specifically beautiful when the cabinet doors are open during active use.
Install a thin LED strip along the front inside edge of each cabinet shelf for the most effective illumination of the shelf contents both from the front and the back. Cabinet interior lighting connected to the door hinge — so the light activates automatically when the door opens and extinguishes when it closes — creates the most user-convenient and the most energy-efficient system. Warm white LEDs at 2700 to 3000 Kelvin create the most flattering and most warmly atmospheric cabinet interior illumination for white or light-colored ceramics and glassware.
16. Side-Opening Refrigerator Door for Clearance Efficiency
A counter-depth French door refrigerator with two half-width doors requires significantly less swing clearance than a conventional single full-width door refrigerator — each narrow half-door swings only half the depth of a full-width door, reducing the clearance zone required in front of the refrigerator by approximately thirty to forty percent. In a tiny kitchen where the refrigerator door clearance zone frequently constrains the usable floor space and limits the kitchen’s comfortable circulation, this clearance reduction is a meaningful improvement in the kitchen’s daily functional quality.
Counter-depth refrigerators — refrigerators designed to sit flush with the surrounding cabinet depth rather than projecting beyond the cabinet line — also improve the tiny kitchen’s visual clarity by eliminating the refrigerator’s protrusion into the kitchen floor space. The counter-depth dimension typically reduces the refrigerator’s storage volume by approximately ten to fifteen percent compared to a standard-depth model of the same width, but the spatial improvement in a tiny kitchen frequently justifies this trade-off. Measure the available floor clearance in front of the refrigerator position before choosing the door configuration.
17. Slim Profile Faucet for Counter Zone Clarity
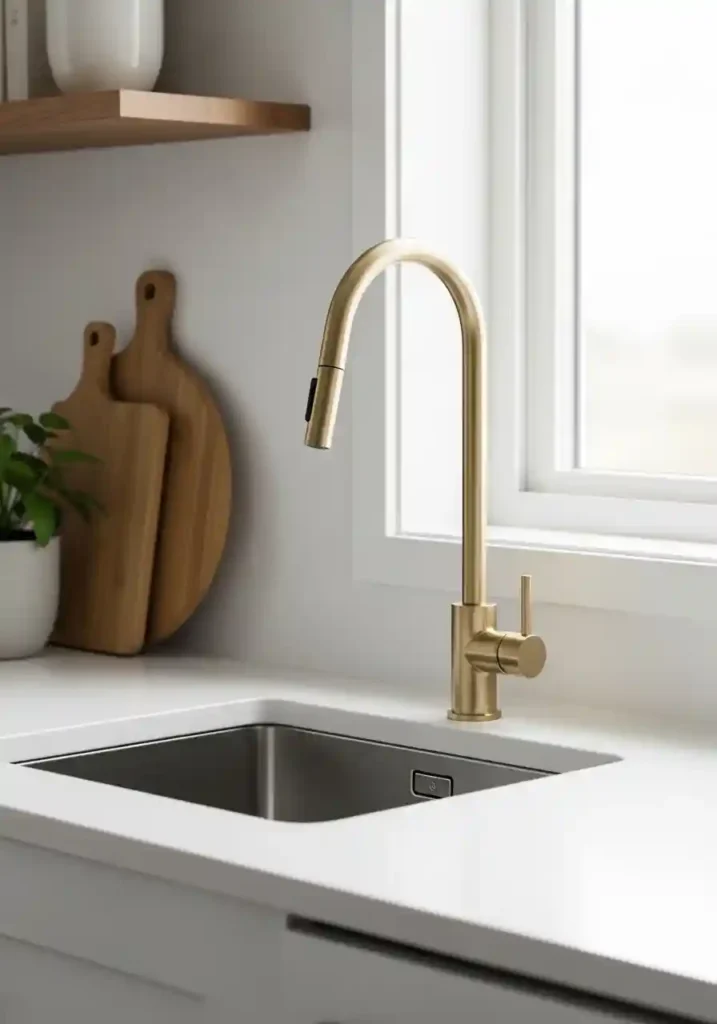
A tall, slim profile kitchen faucet with a single clean column neck and a simple handle assembly keeps the sink zone visually clean and specifically uncluttered — the visual simplicity of a slim gooseneck faucet creates less visual noise in the tiny kitchen’s most actively used zone than a multi-component faucet assembly with separate spray heads, soap dispensers, and multiple handles. Visual simplicity at the sink zone specifically benefits a tiny kitchen where the density of necessary fixtures and appliances can easily create the kind of visual complexity that makes small spaces feel crowded.
Choose a faucet with a high gooseneck profile rather than a low-arc profile — the high gooseneck creates clearance to fill tall pots and clean tall items without angling them awkwardly beneath a low-clearance spout. A single-handle faucet rather than a double-handle design reduces the visual complexity of the faucet assembly and simplifies daily use. The faucet finish should coordinate with the kitchen’s other hardware finishes — choosing a matching or complementary finish to the cabinet hardware creates the most cohesive and the most specifically resolved tiny kitchen aesthetic.
18. Sliding Cabinet Doors for Clearance-Free Access
Sliding cabinet doors eliminate the clearance zone that conventional swing-out doors require in front of the cabinet — in a tiny kitchen where counter-to-opposite-wall clearance may be limited to ninety or one hundred centimeters, a conventional upper cabinet door swinging outward consumes a significant portion of the available movement space and can create genuinely impractical access conditions. Sliding doors that move laterally across the cabinet face require zero clearance beyond the cabinet’s face and make the tight kitchen clearance genuinely functional for comfortable daily use.
The trade-off of sliding cabinet doors is that they provide access to only half the cabinet width at a time — one panel slides left while the other slides right, requiring repositioning to access items behind whichever panel is currently blocking. For most kitchen storage scenarios, this half-at-a-time access is entirely acceptable in exchange for the clearance benefit. Choose a smooth-running ball-bearing track system rather than a friction-based sliding system for the most reliably effortless sliding cabinet door operation over years of regular kitchen use.
19. Wall-Mounted Fold-Out Breakfast Station
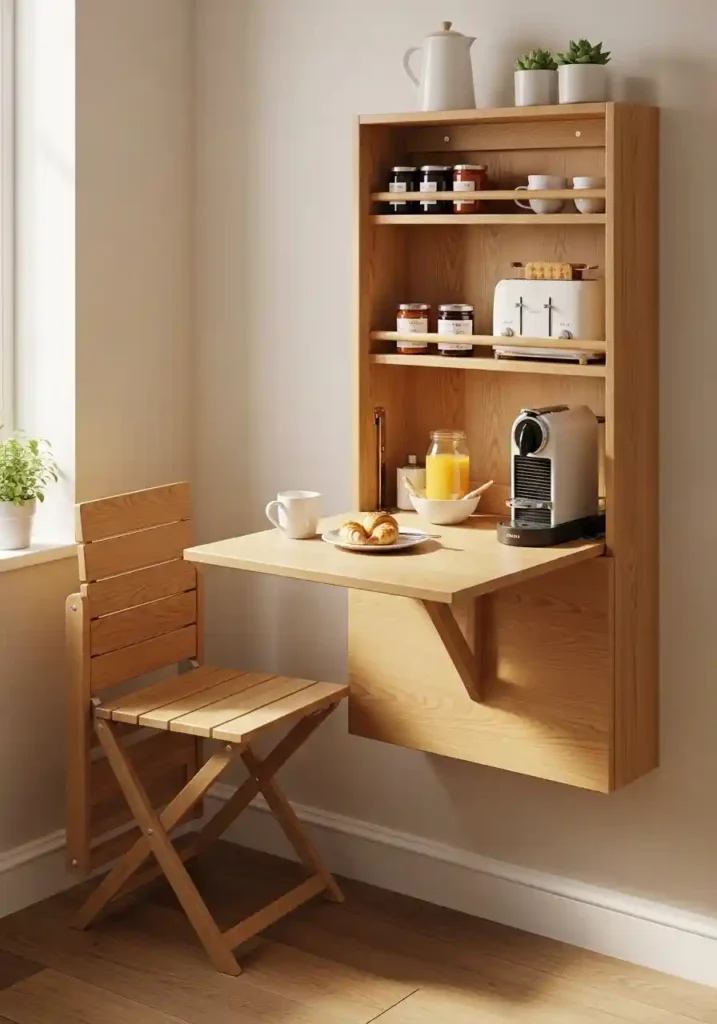
A small fold-out wall shelf specifically sized and positioned for the coffee maker or toaster creates a dedicated breakfast station that can be deployed for morning use and folded flush against the wall during the remainder of the day, returning the floor space below it to the kitchen’s general use area. This fold-out approach to small appliance station design applies the same zero-floor-space-when-folded principle of a fold-down dining table to a kitchen appliance use zone, creating dedicated function without permanent counter space commitment.
Mount the fold-out breakfast station at comfortable standing counter height — approximately ninety centimeters from the floor — with a wall-mounted electrical outlet immediately beside or directly above the shelf to eliminate counter-to-outlet cord extension across the kitchen. Size the shelf to accommodate the specific appliance it will host — the coffee maker’s footprint plus a small amount of working space — rather than creating an oversized surface that wastes the fold-out mechanism’s spatial efficiency. A simple piano hinge and a single folding bracket support the shelf most reliably at this scale.
20. Contrasting Island or Cart Color for Visual Interest
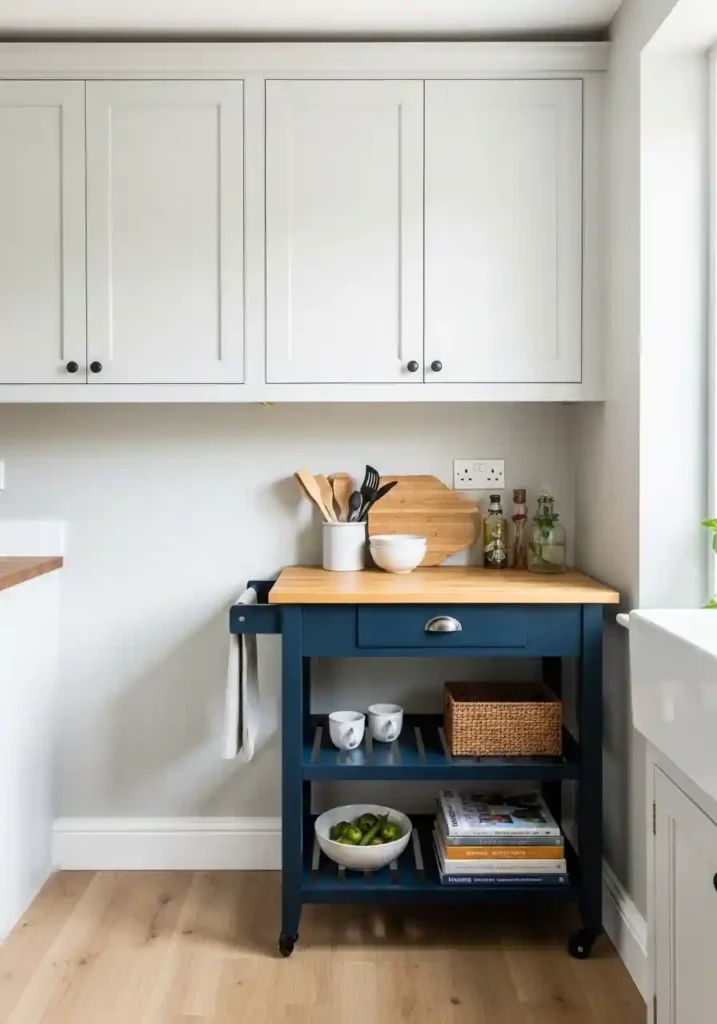
A kitchen cart or slim island in a contrasting color to the surrounding cabinetry creates a specific visual focal point that adds genuine personality and visual depth to a tiny kitchen that might otherwise risk appearing flat or monotonous with its uniformly light surface palette — the contrasting cart color draws the eye, creates visual interest, and makes the tiny kitchen appear more specifically designed and more specifically curated than an all-matching material scheme would create. This design intelligence applies the principle of intentional contrast rather than forced uniformity.
Choose a cart color that complements the kitchen’s existing palette as an intentional accent — a navy blue cart against white cabinetry, a forest green cart against cream cabinetry, or a warm terracotta cart against pale grey cabinetry creates the most aesthetically resolved and the most specifically beautiful contrasting cart result. The cart’s top material and the kitchen’s countertop material do not need to match — a natural butcher block cart top against a white stone kitchen counter creates a warm, specifically layered material contrast that enriches the tiny kitchen’s visual character.
21. Under-Shelf Basket Storage for Cabinet Interior Maximization
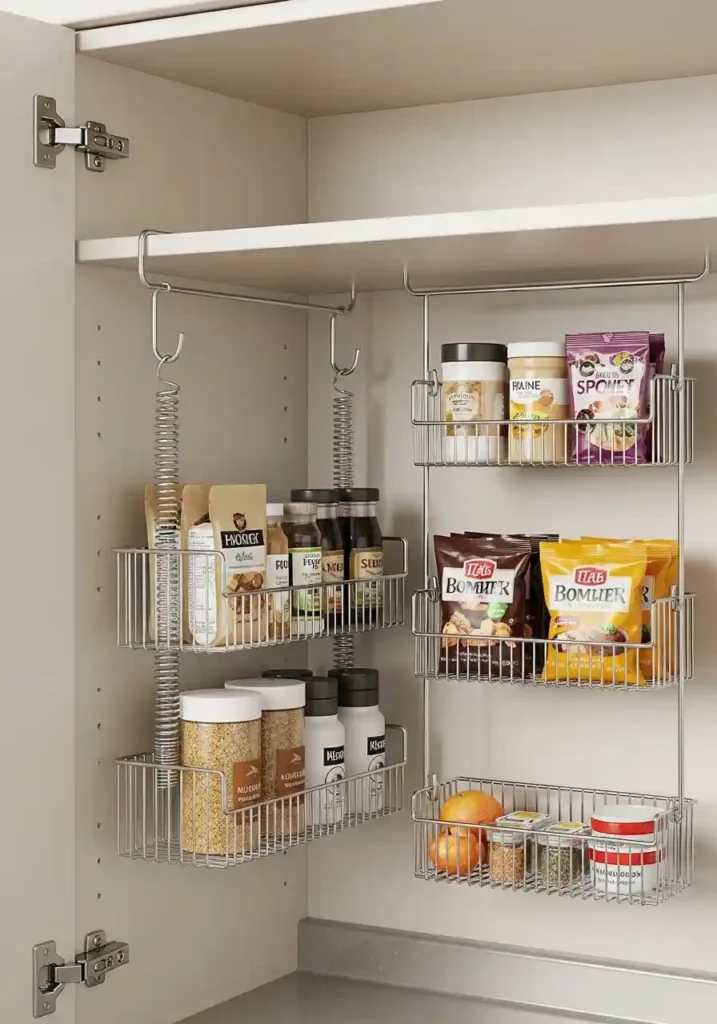
Under-shelf hanging baskets clipped to the bottom of cabinet shelves create additional suspended storage tiers within existing cabinets without any permanent installation or modification — the spring-clip mounting system allows the baskets to be attached, removed, and repositioned at any time. Each basket effectively adds a storage tier within the cabinet by using the space between the shelf surface and the items stored on the shelf below, which in most cabinet configurations goes completely unused. A set of four under-shelf baskets installed across the kitchen’s upper cabinets creates meaningful additional storage capacity at zero installation cost.
Choose baskets sized appropriately for the items intended for suspended storage — small wire baskets work best for lightweight, small items like spice packets, tea bags, snack bars, and small produce that benefit from the airflow that wire baskets provide. Larger suspended baskets for heavier items may put excessive stress on the spring-clip mounting system. The under-shelf basket addition is one of the most immediately implementable and the most immediately impactful tiny kitchen organization improvements available — requiring only the purchase of the baskets themselves and five minutes of installation.
22. Tiered Corner Shelf for Counter Corner Maximization
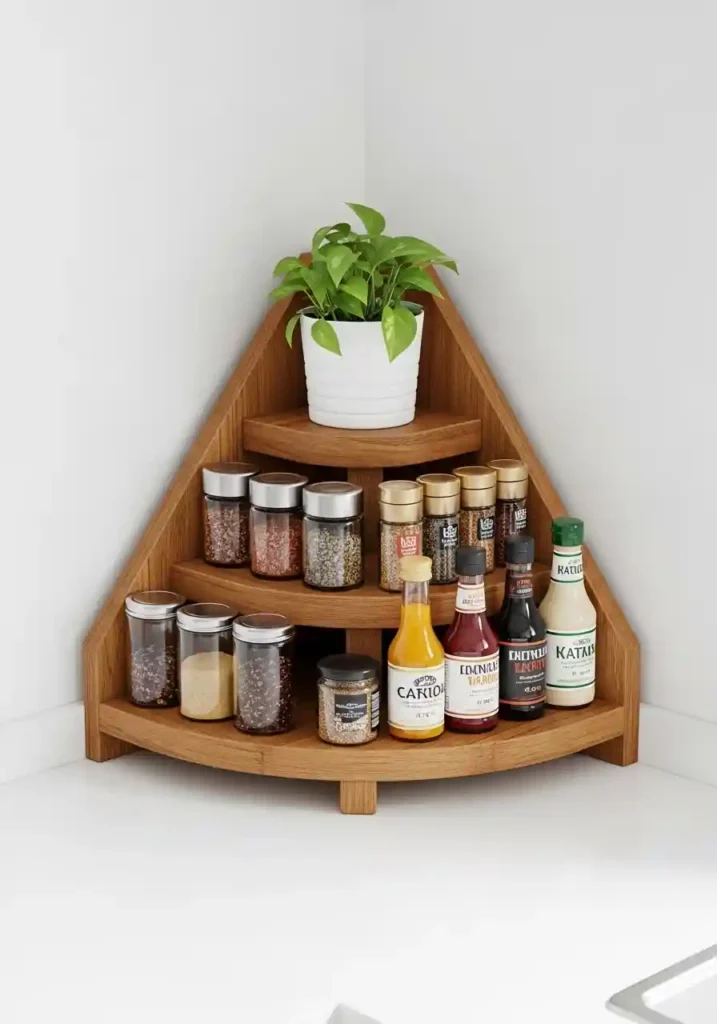
A tiered corner shelf organizer placed in the counter corner angle between two counter surfaces converts one of the most consistently wasted areas in any kitchen — the corner where two counter surfaces meet at an awkward angle — into a tiered organization system for small items that previously occupied the main counter surface. The stepped shelf structure creates multiple accessible tiers within a footprint that was already occupied by the corner dead zone, effectively creating additional organized storage from space that was contributing nothing to the kitchen’s functional capacity.
Choose a tiered corner shelf in a material that complements the kitchen’s existing materials — a warm wood corner shelf against a white counter, a marble-look acrylic shelf against a stone counter, or a stainless steel corner shelf in a professional kitchen aesthetic. The tiered corner shelf specifically suits the organization of small, frequently accessed items — spice jars, small condiment bottles, cooking oils, and small utensil cups — that benefit from accessibility and visibility. Keep the corner shelf curated rather than filled with overflow to maintain the visual organization that makes the tiny kitchen feel most specifically designed.
23. Overhead Pot Rack for Ceiling Storage Utilization
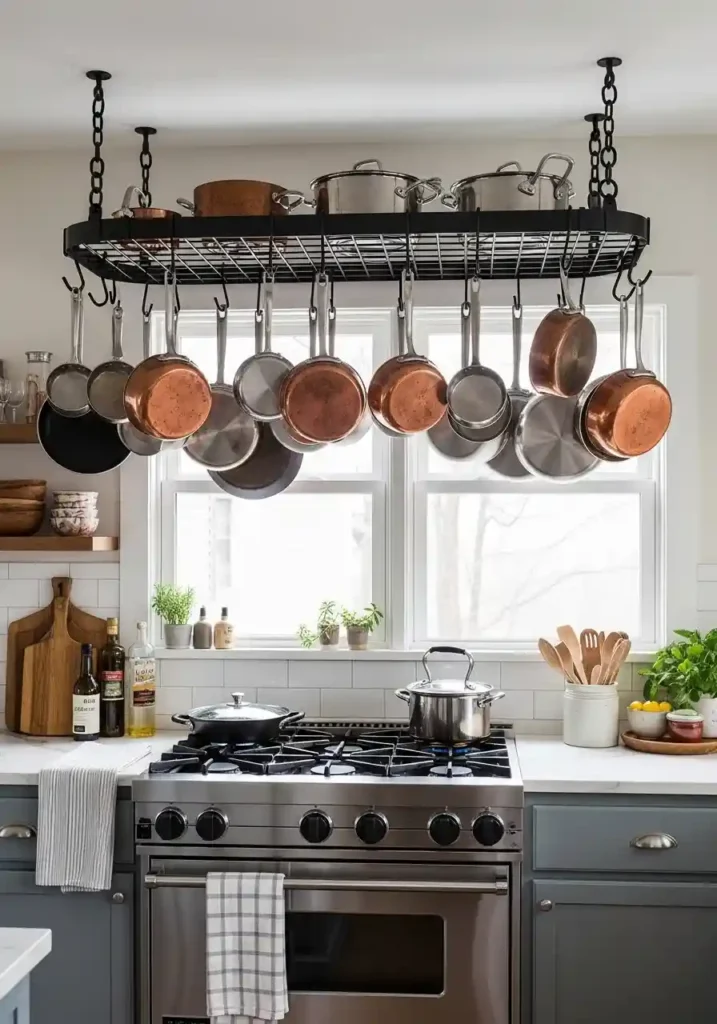
A ceiling-mounted pot rack positioned above the cooking zone moves the pot and pan collection from the lower cabinet space to the ceiling, returning entire lower cabinet sections to storage of other kitchen items while simultaneously creating a warmly professional kitchen aesthetic through the displayed cookware. The ceiling is typically the most completely underutilized surface in a tiny kitchen — pot rack installation converts this overhead dead zone into the most visually impactful and the most practical storage addition available in the tiny kitchen’s vertical dimension.
Install the pot rack into ceiling joists or with structural ceiling anchors specifically rated for the combined weight of the rack and the maximum anticipated cookware load with an appropriate safety margin. A rack positioned directly above the cooking surface provides the most ergonomically efficient access — lifting pots directly from the rack above the stove without carrying them across the kitchen is the most practically convenient pot rack arrangement. Choose hanging S-hooks of consistent size and finish for the most organized and the most specifically beautiful pot rack display.
24. Consistent Grout Color for Expanded Tile Surface Perception

Choosing grout in the same color as the tile — or very closely matched — creates a tile surface where the grout lines disappear into the tile’s overall color field, making the backsplash read as a large, continuous surface rather than as a grid of individual tiles. In a tiny kitchen where the backsplash represents a significant portion of the visible wall surface, eliminating the visual interruption of contrasting grout lines creates a more expansive, more continuous, and more specifically clean backsplash surface that contributes meaningfully to the kitchen’s overall impression of visual generosity.
White grout with white tiles creates the most seamless and the most spacious backsplash surface — the tile’s reflective surface and the grout’s matching tone combine to create a nearly uniform reflective wall that bounces light back into the tiny kitchen from every tile face simultaneously. For light-colored tiles in tones other than white — cream, pale grey, soft sage — choose a grout within the same tonal family rather than a contrasting dark grey or dark charcoal. The consistent tone creates the most spatially expansive and the most specifically beautiful tile surface in any tiny kitchen.
Frequently Asked Questions
What is the most important design trick for a tiny kitchen?
The single most impactful design improvement for most tiny kitchens is clearing the countertops completely — removing every appliance, tool, and item that can be stored elsewhere and returning the counter surface to clear food preparation space. This costs nothing and creates the most immediately dramatic spatial improvement available in any tiny kitchen. After clearing, installing floor-to-ceiling cabinetry and wall-mounted storage systems maintains the clear counter surface by providing appropriate homes for every displaced item.
How do you make a tiny kitchen feel bigger without renovating?
The most effective non-renovation strategies include painting the cabinets and walls in the same light, warm tone; removing items from countertops; adding a large mirror or mirrored backsplash; installing LED strip lighting under upper cabinets; replacing hardware with a consistent single finish throughout; adding floating shelves to unused wall surfaces; and moving the dish drying rack above the sink. These changes collectively create a kitchen that reads as significantly more organized, more designed, and more spacious than before.
What are the best storage solutions for tiny kitchens?
The most effective tiny kitchen storage solutions include floor-to-ceiling cabinetry, magnetic wall panels for knives and spices, pull-out pantry towers in narrow gaps, under-shelf hanging baskets within existing cabinets, tension rod vertical dividers for flat pan storage, pull-out shelves within deep lower cabinets, ceiling-mounted pot racks, and over-sink wall-mounted dish racks. The organizing principle across all these solutions is moving storage from horizontal floor surface to vertical wall and ceiling surfaces.
What is the best color for a tiny kitchen?
Warm light neutrals — warm white, soft cream, pale warm grey, and gentle sage — create the most spatially expansive tiny kitchen environment because these tones reflect light rather than absorbing it, making every surface appear to recede slightly and the kitchen to feel more generous. Using the same tone on both walls and cabinetry creates the most unified and the most expansive visual effect. High-gloss or semi-gloss finishes amplify the light-reflective benefit of light colors significantly.
Should I use open shelving in a tiny kitchen?
Open shelving is beneficial in a tiny kitchen when used selectively — replacing two to four upper cabinet units with open shelves creates visual airy lightness and depth in the upper kitchen zone while retaining closed storage for less attractive practical items. Open shelves require consistent curation and regular organizing maintenance since everything stored on them is permanently visible. A combination of some open shelves and some closed cabinets typically creates the best balance of visual openness and organizational practicality in a tiny kitchen.
What is the best countertop for a tiny kitchen?
Light-toned countertops — white or very pale marble-look surfaces, pale stone, or light warm wood — create the most visually expansive tiny kitchen counter zone by reflecting light and appearing to recede into the kitchen’s overall light palette. An undermount sink in any counter material creates additional visual continuity by eliminating the rim interruption of a drop-in sink. The countertop material should complement both the cabinetry and the backsplash materials for the most cohesive and the most spatially resolved tiny kitchen surface composition.
How much clearance do you need in a tiny kitchen?
The minimum recommended circulation clearance in a kitchen is ninety centimeters between facing surfaces — enough for one person to work comfortably and for another person to pass behind. For a kitchen serving multiple simultaneous users, one hundred and five to one hundred and twenty centimeters is more appropriate. These clearance minimums apply between the counter edge and any opposite cabinet, island, or wall. Choosing counter-depth appliances, eliminating floor-standing storage furniture, and using sliding rather than swing-out cabinet doors in tight zones helps maintain these minimum clearances in the smallest kitchens.
Conclusion:
A tiny kitchen that works brilliantly is not a kitchen that has been magically expanded — it is a kitchen where every surface, every wall, every vertical zone, and every structural element has been called into service as a contributor to the kitchen’s total functional and visual capacity. Every single one of these twenty-four tricks demonstrates the same fundamental truth: the limit of a tiny kitchen is almost never its actual square footage. It is the percentage of the available space — including walls, ceilings, backs of doors, under-shelf spaces, and corner zones — that has been genuinely activated for useful storage and organizational purpose. Save this article for reference, share it with someone who is struggling with a compact cooking space, and choose even two or three of these tricks to implement this week. The transformation of a tiny kitchen through intelligent design thinking almost always delivers more immediate and more dramatically functional results than the space’s dimensions suggest are possible before you begin. Which of these twenty-four design tricks is your tiny kitchen most specifically ready for?


